Maven Hello World example

In this post we will see a sample web project which displays "Hello World" in the web browser. To achieve this we need to open a maven project. Click File -> New -> Other -> Maven Project.
Then click "Next" and next type "webapp" in the Filter. Select the following details:
  • GroupId: org.codehaus.mojo.archetypes
  • ArtifactId: webapp-j2ee14
  • Version: 1.3
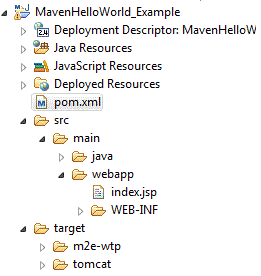
Then click Next and provide GroupId, ArtifactId and other details as per your choice. The project created looks like the below screen.
The project will have many files including "pom.xml" and "index.jsp". Open "pom.xml" file and make the following changes. Replace "build" tag with the below code. Since we want to use tomcat 7 in our project we need to mention the same in the pom.xml file.
  <build>
    <plugins>
      <plugin>
        <groupId>org.apache.tomcat.maven</groupId>
        <artifactId>tomcat7-maven-plugin</artifactId>
        <version>7</version>
      </plugin>
    </plugins>
  </build>
The complete "pom.xml" file looks like this.
<project xmlns="http://maven.apache.org/POM/4.0.0" xmlns:xsi="http://www.w3.org/2001/XMLSchema-instance"
  xsi:schemaLocation="http://maven.apache.org/POM/4.0.0 http://maven.apache.org/xsd/maven-4.0.0.xsd">
  <modelVersion>4.0.0</modelVersion>

  <groupId>Maven_Hello_World</groupId>
  <artifactId>MavenHelloWorld_Example</artifactId>
  <version>0.0.1-SNAPSHOT</version>
  <packaging>war</packaging>

  <name>MavenHelloWorld_Example</name>
  <url>http://maven.apache.org</url>

  <dependencies>
    <dependency>
      <groupId>javax.servlet</groupId>
      <artifactId>servlet-api</artifactId>
      <version>2.4</version>
      <scope>provided</scope>
    </dependency>
    <dependency>
      <groupId>javax.servlet.jsp</groupId>
      <artifactId>jsp-api</artifactId>
      <version>2.1</version>
      <scope>provided</scope>
    </dependency>
  </dependencies>

  <build>
    <plugins>
      <plugin>
        <groupId>org.apache.tomcat.maven</groupId>
        <artifactId>tomcat7-maven-plugin</artifactId>
        <version>7</version>
      </plugin>
    </plugins>
  </build>
</project>
After the changes are made to the "pom.xml" file, right click on the file and then "Run As -> Maven clean". Next right click on the same file and then do "Run As -> Maven generate-sources". These two above steps will clean the project and rebuild it which will help in removing any errors if any.
Next build the project. This can be done by right clicking on the "pom.xml" file and "Run As -> Maven build...". Please check that there are two Maven build options given. When we run our project for the first time, use the option "Maven build...".
This will open a window where in we need to give "tomcat:run" in the "Goals:" and then click on Run as shown in the below screen.
The project will run successfully but it will not show any output. To get the output we need to open a browser and enter the following URL.

http://localhost:8080/MavenHelloWorld_Example
This URL is provided by the maven in the console as shown below.
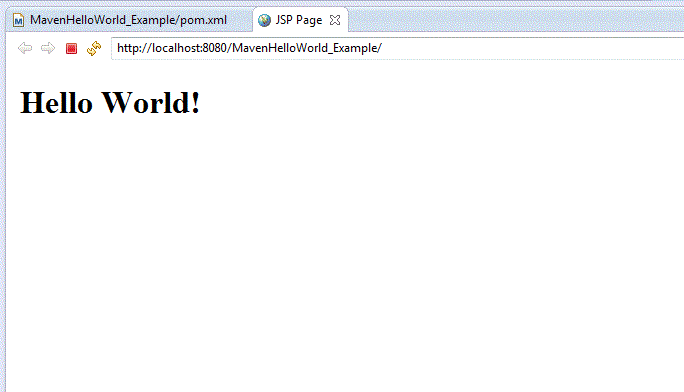
The URL will give the following output in the browser.

Adding dependencies for Spring and Hibernate

In this post we will see how to use maven for building dependencies for Spring, Hibernate etc. To start with, click on File -> New -> Other as shown below.
In the New window, type maven and select "Maven Project" and click Next.
Do not select anything here. Leave the default check box as it is and click Next.
In this window, the default ArtifactId select would be "maven-archetype-quickstart". Click Next.
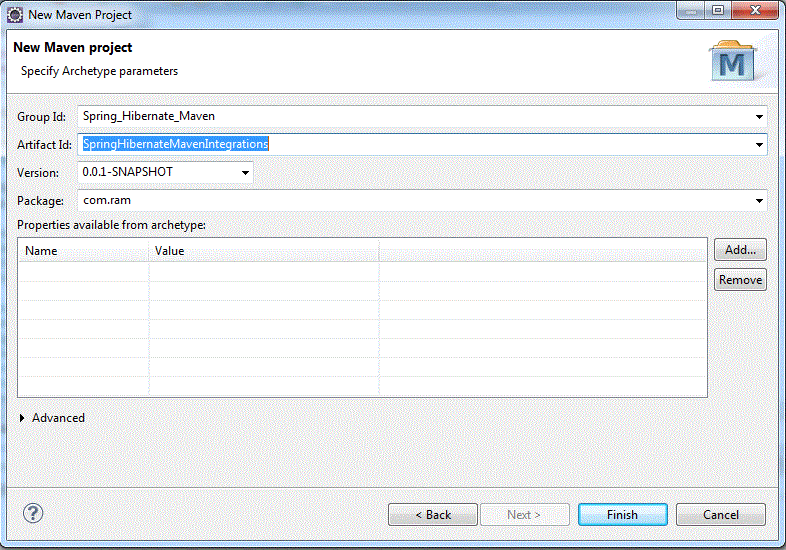
In this window, give the following details and click Finish. ArtifactId is the name of the project.
This creates folders and a pom.xml file. This "pom.xml" file is the back bone for maven. We can add jar files to our project by adding dependencies to the pom.xml file. Open pom.xml file. Suppose we want to add spring-orm jar file. To do that, open google.com and search for "hibernate-core maven". Click on the first link (http://mvnrepository.com/artifact/org.hibernate/hibernate-core/3.6.10.Final). This link will display the list of jar file versions and its related binary file to be down loaded. Let us suppose that we have chosen the version "3.6.10.FINAL" for our project. So click on the version and it will give the piece of code to be added for the pom.xml file. Copy this code and paste it in the pom.xml file under the dependencies tag. Once the piece of code has been added and saved, you can observe that maven downloads the jar that has been added for dependency. The following screens will make it more clear for understanding.
<project xmlns="http://maven.apache.org/POM/4.0.0" xmlns:xsi="http://www.w3.org/2001/XMLSchema-instance"
 xsi:schemaLocation="http://maven.apache.org/POM/4.0.0 http://maven.apache.org/xsd/maven-4.0.0.xsd">
 <modelVersion>4.0.0</modelVersion>

 <groupId>Spring_Hibernate_Maven</groupId>
 <artifactId>SpringHibernateMavenIntegration</artifactId>
 <version>0.0.1-SNAPSHOT</version>
 <packaging>jar</packaging>

 <name>SpringHibernateMavenIntegration</name>
 <url>http://maven.apache.org</url>

 <properties>
  <project.build.sourceEncoding>UTF-8</project.build.sourceEncoding>
  <junit.version>3.8.1</junit.version>
 </properties>

 <dependencies>
  <dependency>
   <groupId>junit</groupId>
   <artifactId>junit</artifactId>
   <version>3.8.1</version>
   <scope>test</scope>
  </dependency>

  <dependency>
   <groupId>org.hibernate</groupId>
   <artifactId>hibernate-core</artifactId>
   <version>3.6.10.Final</version>
  </dependency>

  <dependency>
   <groupId>org.springframework</groupId>
   <artifactId>spring-orm</artifactId>
   <version>3.2.6.RELEASE</version>
  </dependency>

  <dependency>
   <groupId>org.springframework</groupId>
   <artifactId>spring-context</artifactId>
   <version>3.2.6.RELEASE</version>
  </dependency>

 </dependencies>
</project>

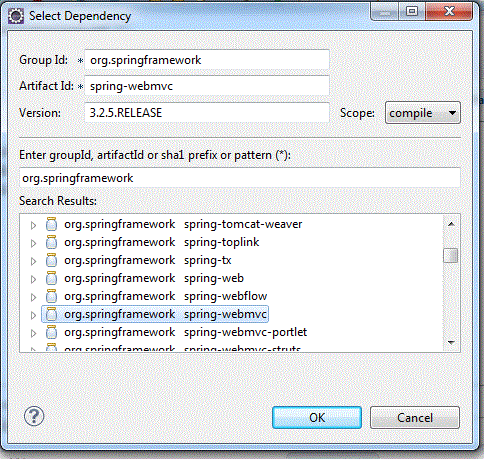
We can also add the dependencies by clicking on the "Add" button in the "Dependencies" tab of the pom.xml file as shown in the below screens.

Maven tutorial

Maven Intro and Maven Integration for Eclipse

In this post we will see what Maven is and how to integrate Maven and Eclipse. Maven is a build tool. Maven provides developers a complete build lifecycle framework. Maven plugins help in building projects. Maven downloads project dependency libraries automatically. For this Maven needs internet connection.
The Maven and Eclipse integration can be done by a plugin. Follow the below steps to add Maven plugin to Eclipse.
As shown in the below picture, open Eclipse. Go to "Help" and select "Install New Software".
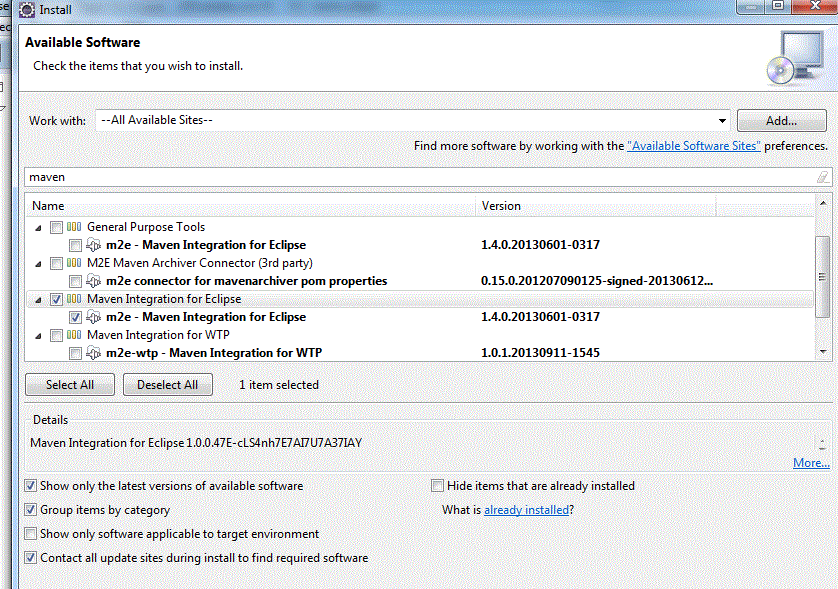
An "Install" window would open. Select "--All Available Sites--" under "Work with:" section. This would list all the available sites. It would take some time to search for the Maven site. So, type maven in the filter section. Select "Maven Integration for Eclipse".
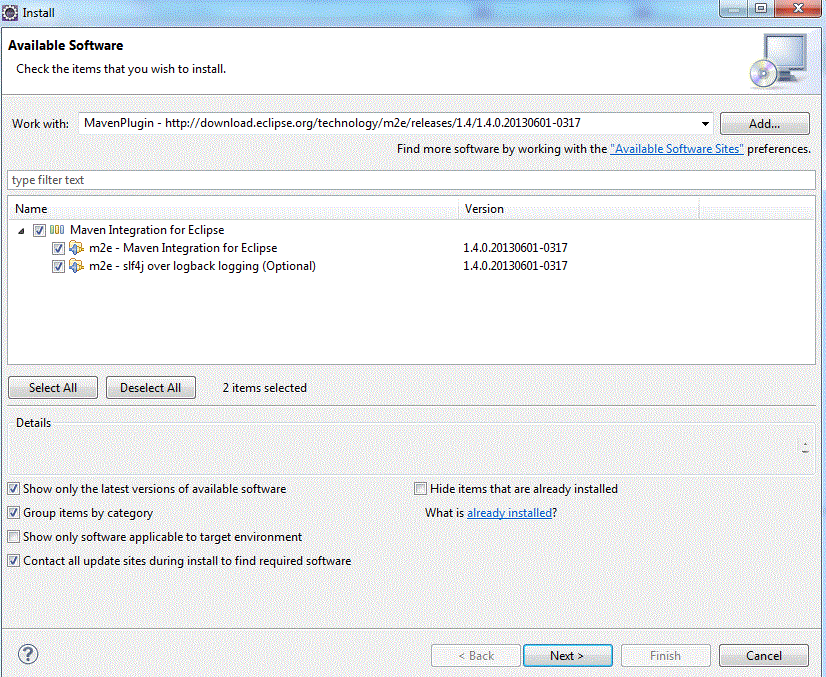
There is another way to get the plugin. In the "Install" window, click on "Add" button. Open a browser and enter this URL: http://wiki.eclipse.org/M2E_updatesite_and_gittags. At the bottom of the page you can see m2e releases. Copy the latest release URL. Now come back to the "Install" window. Give some name in the Add Repository window, like "MavenPlugin" and then paste the copied URL in the Location box as shown in the below picture.
Select "Maven Integration for Eclipse" from the list and click "Next".
Select the "I accept the terms of the license agreement" and click "Finish".
Now Eclipse will install the required software as shown in the picture below.
Once the installation has been done, Eclipse will ask for restart. Click "Yes".
Once the Eclipse has been restarted, click File -> Other, as shown below.
In the New window, type "maven" in the Wizards section. If the Maven has been installed properly then you should see "Maven Project".

JSP interview questions and answers

  1. What is JSP?
    Answer: JSP stands for JavaServer Pages. JSP is java server side technology to create dynamic web pages. JSP is extension of Servlet technology to help developers create dynamic pages with HTML like syntax.
  2. Explain lifecycle of a JSP.
    Answer: Whenever a JSP page is requested for the first time or the JSP page has been modified, then JSP page is translated into a servlet class and the servlet class is compiled. This servlet class is equivalent to any servlet class but few changes in the names of the methods. A JSP Lifecycle consists of following steps:
    • Translation
    • Compilation
    • Loading the class
    • Instantiating the class
    • jspInit() invocation
    • _jspService() invocation
    • jspDestroy() invocation
    "jspInit()" method is similar to init() method of servlets. This method is invoked by the container only once when a JSP page is initialized. It can be overridden by a page author to initialize resources such as database and network connections, and to allow a JSP page to read persistent configuration data. "_jspService()" is the JSP method that gets invoked by JSP container for each client request by passing request and response object. Notice that method name starts with underscore to distinguish it from other lifecycle methods because we can’t override this method. All the JSP code goes inside this method and it’s overridden by default. A page author cannot override this method, as its implementation is provided by the container. "jspDestroy()" method is called by container when JSP is unloaded from memory such as shutting down application or container. This method is called only once in JSP lifecycle and we should override this method to release any resources created in JSP init method.
  3. Explain about implicit or well known variables in JSP
    Answer: According to the jsp specification we can use the following variables as part of the scriptlets without declaring the variables in the jsp page. These variables are called as "well known variables" or "implicit variables". There are 9 implicit variables:
    • pageContextis a convenient class which provides the methods like forward, include, getSession, getServletConfig, getServletContext, getRequest, getResponse, setAttribute, getAttribute, removeAttribute etc.
    • requestobject is an instance of a java class that implements the javax.servlet.http.HttpServletRequest interface. The request object can be used to get header information, parameters, attributes etc.
    • responseobject is an instance of a java class that implements the javax.servlet.http.HttpServletResponse interface. Using the "response" object we can set the response content type, add cookie and redirect the response.
    • sessionobject is an instance of a java class that implements the javax.servlet.http.HttpSession interface. Using the "session" object we can store session state for a single user.
    • applicationobject is an instance of a java class that implements the javax.servlet.ServletContext interface. It gives facility for a JSP page to obtain and set information about the web application in which it is running.
    • outobject is an instance of the javax.servlet.jsp.JspWriter class. Using the "out" object we can send some content to the client. In other words we can write the output content.
    • configobject is instance of javax.servlet.ServletConfig implementation and used to get the JSP init params configured in deployment descriptor.
    • exceptionobject is instance of java.lang.Throwable class and used to provide exception details in JSP error pages.
    • pageobject is instance of java.lang.Object class and represents the current JSP page. page object provide reference to the generated servlet class. This object is very rarely used.
  4. What is a scriptlet?
    Answer: A scriptlet contains Java code that is written between <% and %> tags, which gets executed whenever a JSP page is invoked. The scriptlet code goes into service() method when the JSP page is translated into a servlet. For example: <% out.println("Hello World!"); %>
  5. What is a JSP declaration?
    Answer: A declaration declares one or more variables or methods that you can use in Java code later in the JSP file. A declaration block is enclosed between the <%! and %> tags. For example: <%! Date theDate = new Date(); %>
  6. What is a JSP expression?
    Answer: An expression is written between the <%= and %> tags. An expression is evaluated, converted to a String, and inserted where the expression appears in the JSP file. It is not required to end the expression with a semicolon, as it implicitly adds a semicolon to all the expressions within the expression tags. For example: Date: <%= new java.util.Date()%>
  7. What are JSP directives?
    Answer: JSP directives are placed between <%@ and %>. JSP directives are used to give special instructions to the container for the translation of JSP to servlet code. These directives affects the overall structure of the servlet class. Following are the directives that JSP provides:
    • page directive: page directive provide attributes that gets applied to the entire JSP page. They define page dependent attributes. Some of the page attributes are as follows: <%@ page import="java.util.Date,java.io.*" %>
      <%@ page buffer="20kb" %>
      <%@ page errorPage="errorPage.jsp" %>
    • include directive: The JSP include directive is used to include the contents of another file to the current JSP page. The files are included during the translation phase. The files to be included can be JSP, HTML etc. An example of include directive is: <%@ include file="two.jsp" %>
    • taglib directive: The JSP taglib directive is used to define a tag library with prefix that we can use in JSP. Declares a tag library, containing custom actions, used in the page. <%@ taglib uri="/WEB-INF/c.tld" prefix="c"%>
  8. Explain about JSP standard action tags.
    Answer: JSP provides with some standard action tags that affect the overall runtime behavior of the JSP. These action tags can be used to include a file, to forward a request to a new page, work with java bean objects. Some of the action tags available are as follows:
    • jsp:include - It includes a response from a servlet or a JSP page into the current page.
    • jsp:forward - To forward the request to another resource.
    • jsp:useBean - To get the java bean object and make it available for the page.
    • jsp:getProperty - It gets the value of a property from a JavaBean and adds it to the response.
    • jsp:setProperty - It sets the properties for a JavaBean.
  9. What is difference between include directive and jsp:include action?
    Answer: The differences between include directive and jsp:include action are as follows:
    1. The include directive is processed at the translation time while the include action is processed at the run time.
    2. The include action always includes the contents of the specified file irrespective of whether the specified file is a static resource or a dynamic resource whereas include action executed a specified dynamic resource and only the result gets included in the response of the calling JSP.
    3. In JSP include action, we can pass params to be used in the included resource with jsp:param action element but in JSP include directive we can’t pass any params.
  10. What is the difference between ServletContext and PageContext?
    Answer: ServletContext gives the information about the container whereas PageContext gives the information about the Request.
  11. Explain about JSP buffer.
    Answer: The JSP buffer is explained with example at ... "Click here"
  12. How do you handle errors in JSP?
    Answer: To handle errors in JSP, we need to set the attribute isErrorPage="true" and also set the ErrorPage to a page which need to be displayed when error occurs. To know more about the error page with an example ... Click here
  13. What are the scopes available in jsp:useBean tag?
    Answer: jsp:useBean tag has the following scopes available:
    1. page: This is the default scope. It specifies that we can use this bean within the JSP page.
    2. request: This scope has wider scope than page. It specifies that we can use this bean from any JSP page that processes the same request.
    3. session: This scope has wider scope than request. It specifies that we can use this bean from any JSP page in the same session whether processes the same request or not.
    4. application: This scope has wider scope than session. It specifies that we can use this bean from any JSP page for the entire application.
  14. What is the difference in using request.getRequestDispatcher() and context.getRequestDispatcher()?
    Answer: request.getRequestDispatcher(path) takes relative path of the resource whereas context.getRequestDispatcher(path) takes the absolute path of the resource.

Spring interview questions and answers

  1. What is spring?
    Answer: Spring is an open source framework, which is light weight. It resolves commonly and repeatedly occurred problems. Spring is famous for its modularity, which means we can use only those parts of spring that we need to build our application. Rest of the parts can be ignored.
  2. What is Inversion Of Control?
    Answer: Inversion of control or IoC is the core of spring framework. As the name suggests IoC manages java objects from construction to destruction. In other words it manages the life cycle of the object. For example, a person X is supposed to do a work. Instead of person X, person Y has done the work. The outcome of the person Y work is used by person X. We call this as "Inversion of Control". In struts we create the DAO object and call the methods. If we use spring IoC, spring is responsible to create DAO class object. Developer is responsible to call the methods of DAO.
  3. What is Dependency Injection?
    Answer: Dependency Injection (DI) is a flavor of Inversion of Control. The inversion of control is more general concept and dependency injection is a concrete form of IoC. Dependency is a process whereby objects define their dependency. There are two ways using which dependency injection can be achieved in spring. One is Setter method injection and the other is using Constructor injection.
  4. What is Aspect Oriented Programming or AOP?
    Answer: In simple words Aspect Oriented Programming (AOP) concept is similar to the triggers concept in data base. Using aspects Spring can add additional functionality to a method execution. This additional functionality could be before a method execution or after method execution.
  5. What is autowiring?
    Answer: The Spring container provides the functionality of connecting beans with each other automatically. Instead of developer injecting one bean into the other using "ref" attribute, Spring can look into the BeanFactory and decide how to inject one bean into the other. This is called as autowiring.
  6. What are the different modes of auto wiring?
    Answer: The autowiring functionality has five modes which can be used to instruct Spring container to use autowiring for dependency injection:
    • no/default
    • byName
    • byType
    • constructor
    • autodetect
    To know more about the auto wiring modes ... Click here
  7. Explain the different bean scopes available in spring.
    Answer: There are different bean scopes that are available in spring. They are:
    • singleton: When singleton scope is given, spring container will create only one instance for that bean.
    • prototype: When prototype scope is given, spring container can create any number of instances.
    • request: Request scopes a bean definition to a HTTP request.
    • session: Session scopes a bean definition to a HTTP session
    • global-session: Global-session scopes a bean definition to a global HTTP session.
  8. Explain about lazy-init concept in spring.
    Answer: Whenever the spring container object is created based on application context it creates all the spring beans and establish the dependencies for all the beans whose scope attribute is default/singleton. If we do not want the spring container to create all the spring beans then we need to set lazy-init to "true". By default this value is "false". When lazy-init is set to "true" then spring container will not create object immediately even if scope is set to "singleton". To know more about lazy-init concept ... Click here
  9. Explain bean life-cycle in spring Bean Factory Container.
    Answer: Bean life cycle in Spring Bean Factory Container is as follows:
    • The spring container finds the bean’s definition from the XML file and instantiates the bean.
    • Using the dependency injection, spring populates all of the properties as specified in the bean definition.
    • If the bean implements the BeanNameAware interface, the factory calls setBeanName() passing the bean’s ID.
    • If the bean implements the BeanFactoryAware interface, the factory calls setBeanFactory(), passing an instance of itself.
    • If there are any BeanPostProcessors associated with the bean, their post- ProcessBeforeInitialization() methods will be called.
    • If an init-method is specified for the bean, it will be called.
    • Finally, if there are any BeanPostProcessors associated with the bean, their postProcessAfterInitialization() methods will be called.
  10. What does @Required annotation mean?
    Answer: The @Required annotation indicates that the affected bean property must be populated at configuration time, through an explicit property value in a bean definition or through autowiring.
  11. What does @Autowired annotation mean?
    Answer: The @Autowired annotation can be used to autowire bean on a setter method or on a constructor or on any method with arbitrary name. This annotation gives developer more control over the code.
  12. What does @Qualifier annotation mean?
    Answer: There may be a situation when you create more than one bean of the same type and want to wire only one of them with a property, in such case you can use @Qualifier annotation along with @Autowired to remove the confusion by specifying which exact bean will be wired.
  13. Explain about java based configuration in spring.
    Answer: Spring has introduced java based configuration to make the task of the developer easy. A developer, instead of writing the configuration in an XML file, can provide the details in the classes where the logic is written with the help of annotations. For example, "@Bean" annotation tells the spring that a method annotated with @Bean will return an object that should be registered as a bean in the Spring application context.
  14. Explain the different concepts in Aspect Oriented Programming
    Answer: There are different concepts in Aspect Oriented Programming. They are as follows:
    • Aspect
    • Join Point
    • Advice
    • Pointcut
    • Introduction
    • Target
    • AOP proxy
    • Weaving
    To know more about these concepts with an example ... Click here
  15. Explain spring MVC architecture.
    Answer: The spring MVC architecture has been explained clearly at ... Spring MVC architecture

JUnit interview questions and answers

  1. What is JUnit?
    Answer: JUnit is an open source testing framework for the java programming language. The test cases are written in java. Test-driven development is the ideal way to create a bug free code.
  2. How to write a Junit test class?
    Answer: Follow the below steps to write a test case:
    • The test class should extend TestCase class.
    • Define a method setUp() and initialize all the objects in that method. This setUp() method should be overridden.
    • Define a method tearDown() and release all the objects. This tearDown() method should also be overridden.
    • For each method, one or more test cases or test methods are written depending on the logic of the method.
  3. What is JUnit TestSuite?
    Answer: JUnit TestSuite is a composite of tests. The TestSuite is a container class under package junit.framework.TestSuite. TestSuite runs a collection of test cases. In JUnit, both @RunWith and @Suite annotation are used to run the suite test.
  4. What are Parameterized tests?
    Answer: Parameterized tests allow user or developer to run the same test over and over again using different values.
  5. What happens if a JUnit Test Method is declared as "private"?
    Answer: If a JUnit test method is declared as private, then the compilation would be successful, but the execution of the test method would fail. This is because JUnit requires all the test methods to be declared as "public" and the return type should be "void"
  6. How do you test a “private” method?
    Answer: "private" methods can only be accessed from the same class. No other class will have any access to the private method. Hence developer has to test the private methods manually.
  7. How can we test a method that do not return anything?
    Answer: There are some ways we can write test case for the methods which do not return anything. The way test cases are written depends on the logic of the method. For example.
    • A method may take parameters and then modify the values or variables of an object.
    • A method may modify values in a file or in a database.
    • A method may change values of static variables.
  8. How do you test a method that throws desired exceptions?
    Answer: Add the optional expected attribute to the @Test annotation. The following is an example test that passes when the expected FileNotFoundException is raised: "@Test(expected=FileNotFoundException.class)"