In this post we will see what Maven is and how to integrate Maven and Eclipse. Maven is a build tool.
Maven provides developers a complete build lifecycle framework. Maven plugins help in building projects.
Maven downloads project dependency libraries automatically. For this Maven needs internet connection.
The Maven and Eclipse integration can be done by a plugin. Follow the below steps to add Maven plugin
to Eclipse.
As shown in the below picture, open Eclipse. Go to "Help" and select "Install New Software".
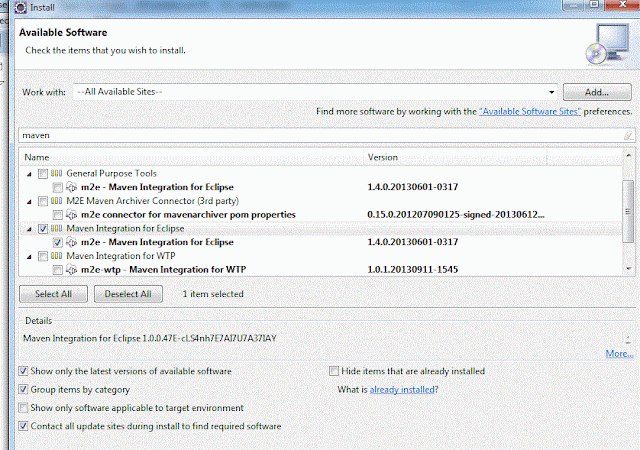
An "Install" window would open. Select "--All Available Sites--" under "Work with:" section.
This would list all the available sites. It would take some time to search for the Maven site.
So, type maven in the filter section. Select "Maven Integration for Eclipse".
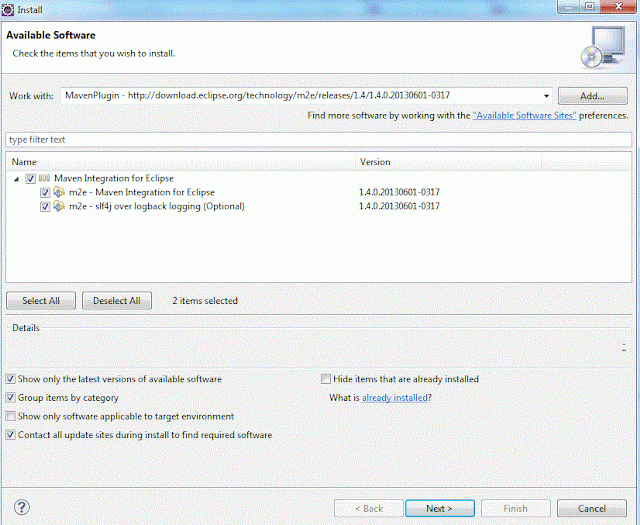
There is another way to get the plugin. In the "Install" window, click on "Add" button. Open a
browser and enter this URL: http://wiki.eclipse.org/M2E_updatesite_and_gittags. At the bottom of the
page you can see m2e releases. Copy the latest release URL. Now come back to the "Install" window.
Give some name in the Add Repository window, like "MavenPlugin" and then paste the copied URL
in the Location box as shown in the below picture.
Select "Maven Integration for Eclipse" from the list and click "Next".
Select the "I accept the terms of the license agreement" and click "Finish".
Now Eclipse will install the required software as shown in the picture below.
Once the installation has been done, Eclipse will ask for restart. Click "Yes".
Once the Eclipse has been restarted, click File -> Other, as shown below.
In the New window, type "maven" in the Wizards section. If the Maven has been installed properly
then you should see "Maven Project".


No comments:
Post a Comment