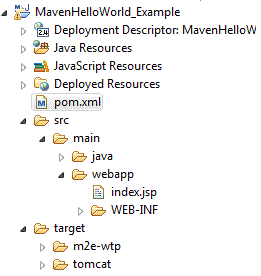
In this post we will see a sample web project which displays "Hello World" in the web
browser. To achieve this we need to open a maven project. Click File -> New -> Other -> Maven Project.
Then click "Next" and next type "webapp" in the Filter. Select the following details:
- GroupId: org.codehaus.mojo.archetypes
- ArtifactId: webapp-j2ee14
- Version: 1.3
The project will have many files including "pom.xml" and "index.jsp".
Open "pom.xml" file and make the following changes. Replace "build" tag with the below code.
Since we want to use tomcat 7 in our project we need to mention the same in the pom.xml file.
  <build>
    <plugins>
      <plugin>
        <groupId>org.apache.tomcat.maven</groupId>
        <artifactId>tomcat7-maven-plugin</artifactId>
        <version>7</version>
      </plugin>
    </plugins>
  </build>
The complete "pom.xml" file looks like this.
<project xmlns="http://maven.apache.org/POM/4.0.0" xmlns:xsi="http://www.w3.org/2001/XMLSchema-instance"
  xsi:schemaLocation="http://maven.apache.org/POM/4.0.0 http://maven.apache.org/xsd/maven-4.0.0.xsd">
  <modelVersion>4.0.0</modelVersion>

  <groupId>Maven_Hello_World</groupId>
  <artifactId>MavenHelloWorld_Example</artifactId>
  <version>0.0.1-SNAPSHOT</version>
  <packaging>war</packaging>

  <name>MavenHelloWorld_Example</name>
  <url>http://maven.apache.org</url>

  <dependencies>
    <dependency>
      <groupId>javax.servlet</groupId>
      <artifactId>servlet-api</artifactId>
      <version>2.4</version>
      <scope>provided</scope>
    </dependency>
    <dependency>
      <groupId>javax.servlet.jsp</groupId>
      <artifactId>jsp-api</artifactId>
      <version>2.1</version>
      <scope>provided</scope>
    </dependency>
  </dependencies>

  <build>
    <plugins>
      <plugin>
        <groupId>org.apache.tomcat.maven</groupId>
        <artifactId>tomcat7-maven-plugin</artifactId>
        <version>7</version>
      </plugin>
    </plugins>
  </build>
</project>
After the changes are made to the "pom.xml" file, right click on the file and
then "Run As -> Maven clean". Next right click on the same file and then do "Run As -> Maven generate-sources".
These two above steps will clean the project and rebuild it which will help in removing
any errors if any.
Next build the project. This can be done by right clicking on the "pom.xml" file and
"Run As -> Maven build...". Please check that there are two Maven build options given.
When we run our project for the first time, use the option "Maven build...".
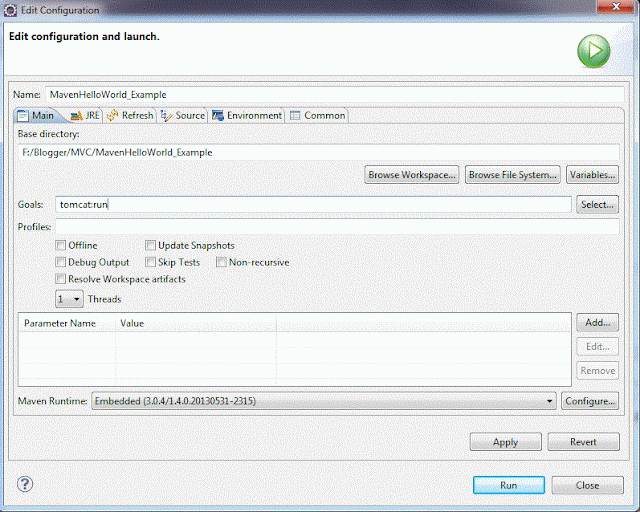
This will open a window where in we need to give "tomcat:run" in the "Goals:" and then
click on Run as shown in the below screen.
The project will run successfully but it will not show any output. To get the output
we need to open a browser and enter the following URL.
http://localhost:8080/MavenHelloWorld_Example
http://localhost:8080/MavenHelloWorld_Example
This URL is provided by the maven in the console as shown below.


No comments:
Post a Comment