JDBC Introduction and sample connection

JDBC or Java Data Base Connectivity is an open specification. As part of this specification JavaSoft has provided some classes like
  • java.sql.DriverManager
  • java.sql.Types
  • java.sql.Date
  • java.sql.Time
  • java.sql.TimeStamp
It also provides a set of interfaces like Connection, Driver, Statement, ResultSet etc
A JDBC driver is a set of classes that provide the implementation of the above interfaces specified as part of JDBC API. Several companies have provided the implementation of JDBC driver. For example, Oracle provides driver in the form of "classes12.jar". Diver manager is responsible for managing the drivers. As part of JDBC DriverManager id provided as a class.
Question: Connection is an interface. How can you create an object to Connection interface?
Answer: We cannot directly create an object to Connection interface. When we execute Connection c = DriverManager.getConnection(); it internally executes the code that is provided by JDBC driver vendor. This code creates an object based on the class provided by the vendor that implements connection interface.
Generic procedure for establishing connection with the data base
  • Register the driver.
  • Use DriverManager.getConnection method to establish the connection with the data base.
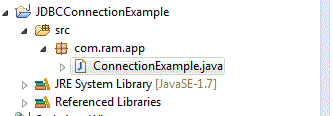
Below is a sample program to connect to Oracle data base. File: com.ram.app.ConnectionExample.java
package com.ram.app;

import java.sql.Connection;
import java.sql.Driver;
import java.sql.DriverManager;

public class ConnectionExample {
 public static void main(String[] args) throws Exception{
  Driver driver = new oracle.jdbc.driver.OracleDriver();
  DriverManager.registerDriver(driver);
  Connection conn = DriverManager.getConnection("dbc:oracle:thin:@localhost:1521:xe","hr","hr");
  System.out.println("Connected to :: "+conn.getClass());
 }
}

Execute ConnectionExample.java file. Output is given below.

String types, collections

There are so many spring types available. Some of them are:
  1. String types
  2. Primitive types
  3. Arrays
  4. Reference types
  5. Collections
By default strings are initialized with "null" value. If we want to initialize them to a null value from configuration, we can make use of null tag.
<property name="middleName"><null/></property>
Below is an example of String[] and ArrayList<String>
First create a Address bean under src as shown below. File: com.ram.beans.Address.java
package com.ram.beans;

import java.util.ArrayList;

public class Address {
 String[] friends;
 ArrayList states;
 
 public String[] getFriends() {
  return friends;
 }
 public void setFriends(String[] friends) {
  this.friends = friends;
 }
 public ArrayList getStates() {
  return states;
 }
 public void setStates(ArrayList states) {
  this.states = states;
 }
}
Next create applicationContext.xml file under src. The file is given below.
<?xml version="1.0" encoding="UTF-8"?>
<beans xmlns="http://www.springframework.org/schema/beans"
 xmlns:xsi="http://www.w3.org/2001/XMLSchema-instance" 
 xmlns:p="http://www.springframework.org/schema/p"
 xsi:schemaLocation="http://www.springframework.org/schema/beans 
 http://www.springframework.org/schema/beans/spring-beans-3.0.xsd">
 
  <bean id="addr" class="com.ram.beans.Address">
  <property name="friends">
   <array>
    <value>Ram</value>
    <value>Veena</value>
   </array>
  </property>
  
  <property name="states">
   <list>
    <value>Victoria</value>
    <value>NSW</value>
    <value>QueensLand</value>
   </list>
  </property>
  
 </bean>
 
</beans>
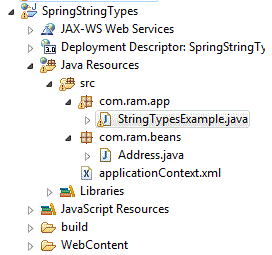
Next create a main class under src as shown. File: com.ram.app.StringTypesExample.java
package com.ram.app;

import org.springframework.context.ApplicationContext;
import org.springframework.context.support.ClassPathXmlApplicationContext;
import com.ram.beans.Address;

public class StringTypesExample {
 public static void main(String[] args) {
  ApplicationContext container = new ClassPathXmlApplicationContext("applicationContext.xml");
  Address addr = container.getBean("addr", Address.class);
  
  //String[]
  System.out.println("String[]: ");
  for(String abc : addr.getFriends()){
   System.out.println(abc);
  }
  
  //ArrayList
  System.out.println("ArrayList: ");
  for(String abc : addr.getStates()){
   System.out.println(abc);
  }
 }
}
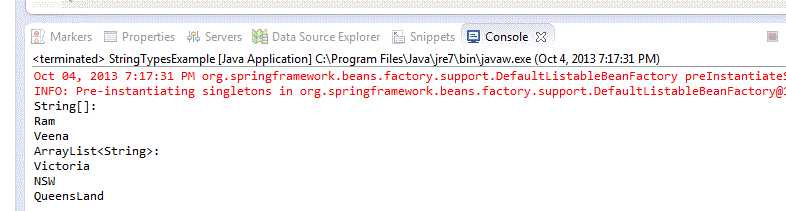
Execute StringTypesExample.java file. Output is given below.
If we have a property whose type is String[] array, we can make use of the following configuration:
 <property name="states">
  <value>Victoria, NSW</value>
 </property>
Instead of value tag w can make use of "array" attribute as shown below
 <property name="states">
  <array>
   <value>VictoriaW</value>
   <value>NSW</value>
  </array>
 </property>
We can use value tag for all primitive data types.
If we have a property whose type is "arraylist", we can make use of the "list" tag as shown below:
 <property name="states">
  <list>
   <value>VictoriaW</value>
   <value>NSW</value>
  </list>
 </property>
If we want to add an "object" to arraylist, we can use "ref" tag
 <list>
  <ref bean="Victoria" />
  <ref bean="NSW" />
 </list>
To supply values to hashset we can use "set" tag as shown below.
 <property name="states">
  <set>
   <value>Melbourne</value>
   <ref bean="Victoria" />
  </set>
 </property> 
To supply values to map or hashmap we can use the following types.
 <property name="states">
  <map>
   <entry key="one" value="Victoria"></entry>
   <entry key="two" value="NSW"></entry>
  </map>
 </property> 
To supply values to "property", we can use the following tag:
 <property name="states">
  <props>
   <prop key="one" value="Victoria"></entry>
   <prop key="two" value="NSW"></entry>
  </props>
 </property> 

Using two applicationContext.xml files

In the spring bean configuration file both id and name attributes does not allow duplicate values (we must supply unique values).
"id" will not allow special characters like "/ , " whereas "name" attribute will allow special characters like "/ , space". By using "name" attribute we can assign multiple names to one spring bean configuration file. For example:
 <bean name="addr1, addr2" class="com.ram.beans.Address">
To supply multiple spring bean configuration files at the time of creating spring container object we must supply configuration file names as shown below.
ApplicationContext container = new ClassPathXmlApplicationContext("spring.xml", "another.xml");
The advantage of multiple container is maintenance becomes easy. Below is an example of multiple containers. One of the container can be considered as parent and another as child.
First create a Address bean under src as shown below. File: com.ram.beans.Address.java
package com.ram.beans;

public class Address {
 private String street;
 private String city;
 private String state;
 
 public String getStreet() {
  return street;
 }
 public void setStreet(String street) {
  this.street = street;
 }
 public String getCity() {
  return city;
 }
 public void setCity(String city) {
  this.city = city;
 }
 public String getState() {
  return state;
 }
 public void setState(String state) {
  this.state = state;
 }
}


First create a Person bean under src as shown below. File: com.ram.beans.Person.java
package com.ram.beans;

public class Person {
 private int pid;
 private String name;
 private Address address;
 
 public int getPid() {
  return pid;
 }
 public void setPid(int pid) {
  this.pid = pid;
 }
 public String getName() {
  return name;
 }
 public void setName(String name) {
  this.name = name;
 }
 public Address getAddress() {
  return address;
 }
 public void setAddress(Address address) {
  this.address = address;
 }
 
}

Next create applicationContext.xml file under src. The file is given below.
<?xml version="1.0" encoding="UTF-8"?>
<beans xmlns="http://www.springframework.org/schema/beans"
 xmlns:xsi="http://www.w3.org/2001/XMLSchema-instance" 
 xmlns:p="http://www.springframework.org/schema/p"
 xsi:schemaLocation="http://www.springframework.org/schema/beans 
 http://www.springframework.org/schema/beans/spring-beans-3.0.xsd">
 
 <bean id="addr" class="com.ram.beans.Address">
  <property name="street" value="Richmond"></property>
  <property name="city" value="Melbourne"></property>
  <property name="state" value="Victoria"></property>
 </bean>
 
</beans>
Next create anotherApplicationContext.xml file under src. The file is given below.
<?xml version="1.0" encoding="UTF-8"?>
<beans xmlns="http://www.springframework.org/schema/beans"
 xmlns:xsi="http://www.w3.org/2001/XMLSchema-instance" 
 xmlns:p="http://www.springframework.org/schema/p"
 xsi:schemaLocation="http://www.springframework.org/schema/beans 
 http://www.springframework.org/schema/beans/spring-beans-3.0.xsd">
 
  <bean id="person" class="com.ram.beans.Person">
  <property name="pid" value="1"></property>
  <property name="name" value="Ram"></property>
  <property name="address">
   <ref parent="addr"/>
  </property>
 </bean>
 
</beans>
Next create a main class under src as shown. File: com.ram.app.TwoAppContextExample.java
package com.ram.app;

import org.springframework.context.ApplicationContext;
import org.springframework.context.support.ClassPathXmlApplicationContext;

import com.ram.beans.Person;

public class TwoAppContextExample {
 public static void main(String[] args) {
  ApplicationContext parentContainer = new ClassPathXmlApplicationContext("applicationContext.xml");
  ApplicationContext childContainer = new ClassPathXmlApplicationContext(new String[]{"anotherApplicationContext.xml"}, parentContainer);
  
  Person person = childContainer.getBean("person", Person.class);
  
  System.out.println(person.getPid());
  System.out.println(person.getName());
  System.out.println(person.getAddress().getStreet());
  System.out.println(person.getAddress().getCity());
  System.out.println(person.getAddress().getState());
 }
}

Execute TwoAppContextExample.java file. Output is given below.
In above xml anotherApplicationContext.xml file, for the "ref" tag we have used an attribute "parent". We have three attributes for reference type. They are:
  1. bean
  2. local
  3. parent

bean: When we specify <ref bean="addr"/> it checks whether the corresponding bean id is available in the current configuration file. If not available it will check in imported configuration file.
local: When we specify <ref local="addr"/> the xpring container checks only in the current spring bean configuration file.
parent: When we specify <ref parent="addr"/> the spring container checks only in the parent spring bean configuration file.

Bean Life Cycle

To control the spring bean life cycle spring has given two interfaces. They are:
  • Initializing bean
  • Disposable bean
These interfaces are available in org.springframework.beans.factory package. Any spring bean can provide the implementation of these two interfaces.
Whenever we create the spring container object the following steps are carried out by the container.
  1. Spring bean object is created
  2. Dependency is established
  3. Check whether afterPropertiesSet() method is available or not. If it is available execute it.
  4. At the time of removal of object, check if destroy method is available. If it is available then execute it.
First create a Address bean under src as shown below. File: com.ram.beans.Address.java
package com.ram.beans;

import org.springframework.beans.factory.DisposableBean;
import org.springframework.beans.factory.InitializingBean;

public class Address implements InitializingBean, DisposableBean{
 private String street;
 private String city;
 private String state;
 
 public String getStreet() {
  return street;
 }
 public void setStreet(String street) {
  this.street = street;
 }
 public String getCity() {
  return city;
 }
 public void setCity(String city) {
  this.city = city;
 }
 public String getState() {
  return state;
 }
 public void setState(String state) {
  this.state = state;
 }
 
 @Override
 public void destroy() throws Exception {
  System.out.println("destroy() method called ...");
 }
 @Override
 public void afterPropertiesSet() throws Exception {
  System.out.println("afterPropertiesSet() method called ...");
 }
}


Next create applicationContext.xml file under src. The file is given below.
<?xml version="1.0" encoding="UTF-8"?>
<beans xmlns="http://www.springframework.org/schema/beans"
 xmlns:xsi="http://www.w3.org/2001/XMLSchema-instance" 
 xmlns:p="http://www.springframework.org/schema/p"
 xsi:schemaLocation="http://www.springframework.org/schema/beans 
 http://www.springframework.org/schema/beans/spring-beans-3.0.xsd">
 
 <bean id="addr" class="com.ram.beans.Address">
  <property name="street" value="Richmond"></property>
  <property name="city" value="Melbourne"></property>
  <property name="state" value="Victoria"></property>
 </bean>
 
</beans>
Next create a main class under src as shown. File: com.ram.app.BeanLifeCycle.java
package com.ram.app;

import org.springframework.context.support.AbstractApplicationContext;
import org.springframework.context.support.ClassPathXmlApplicationContext;

import com.ram.beans.Address;

public class BeanLifeCycle {
 public static void main(String[] args) {
  AbstractApplicationContext container = new ClassPathXmlApplicationContext("applicationContext.xml");
  Address address = container.getBean("address", Address.class);
  
  System.out.println("Street = "+address.getStreet());
  System.out.println("City = "+address.getCity());
  System.out.println("State = "+address.getState());
  
  // To remove spring bean objects available in container
  container.registerShutdownHook();
 }
}

Execute BeanLifeCycle.java file. Output is given below.
Instead of using InitializingBean and DisposableBean we can use our own methods as the life cycle methods. For Example:
public class Address{
 public void init() throws Exception{
  System.out.println("init() method called ...");
 }
 
 public void destroy() throws Exception{
  System.out.println("destroy() method called ...");
 }
}
If the spring container wants to call these methods, we have to configure in the spring configuration file as shown below:
<bean id="addr" class="com.ram.beans.Address" init-method="init" destroy-method="destroy">

I18N Applications

Spring has provided support for I18N (Internationalization) applications as part of application context. To support I18N applications, we can make use of an interface called "MessageSource". This interface is implemented by the following three classes.
  • MessageSourceResourceBundle
  • ReloadableResourceBundleMessageSource
  • StaticMessageSource
First create a properties file under src as shown below. File: resource_en_us.properties
firstName=Ram
lastName=Akunuru

Next create applicationContext.xml file under src. The file is given below.
<?xml version="1.0" encoding="UTF-8"?>
<beans xmlns="http://www.springframework.org/schema/beans"
 xmlns:xsi="http://www.w3.org/2001/XMLSchema-instance" 
 xmlns:p="http://www.springframework.org/schema/p"
 xsi:schemaLocation="http://www.springframework.org/schema/beans 
 http://www.springframework.org/schema/beans/spring-beans-3.0.xsd">
 
  <bean id="messageSource" class="org.springframework.context.support.ResourceBundleMessageSource">
  <property name="basename" value="resource_en_us" />
 </bean>
 
</beans>
Next create a main class under src as shown. File: com.ram.app.I18NApp.java
package com.ram.app;

import java.util.Locale;
import org.springframework.context.ApplicationContext;
import org.springframework.context.support.ClassPathXmlApplicationContext;

public class I18NApp {
 public static void main(String[] args) {
  ApplicationContext container = new ClassPathXmlApplicationContext("applicationContext.xml");
  System.out.println("First Name: "+ container.getMessage("firstName", null, Locale.ENGLISH));
  System.out.println("Last Name: "+container.getMessage("lastName", null, Locale.ENGLISH));
 }

}

Execute I18NApp.java file. Output is given below.

Constructor Injection

In spring we have two types of injections. They are:
  1. Setter method injection
  2. Construcotr injection
In case of Setter method injection, setter method is responsible to perform dependency injection. All the topics that were explained previously used setter method injection. In case of constructor injection, we have to define constructors to perform the dependency injection. The following is an example of constructor injection.

First create an Address bean under src as shown below. File: com.ram.app.Address.java
package com.ram.app;

public class Address {
 private String street;
 private String city;
 private String state;
 
 public Address(String street, String city, String state) {
  this.street = street;
  this.city = city;
  this.state = state;
 }
 
 public Address(String city, String state) {
  this.city = city;
  this.state = state;
 }
 
 public void display(){
  System.out.println("Street = "+street);
  System.out.println("City = "+city);
  System.out.println("State = "+state);
 }
 
}

Next create applicationContext.xml file under src. The file is given below.
<?xml version="1.0" encoding="UTF-8"?>
<beans xmlns="http://www.springframework.org/schema/beans"
 xmlns:xsi="http://www.w3.org/2001/XMLSchema-instance" 
 xmlns:p="http://www.springframework.org/schema/p"
 xsi:schemaLocation="http://www.springframework.org/schema/beans 
 http://www.springframework.org/schema/beans/spring-beans-3.0.xsd">
 
  <bean id="addr" class="com.ram.app.Address">
  <constructor-arg index="0" value="Richmond"></constructor-arg>
  <constructor-arg index="1" value="Melbourne"></constructor-arg>
  <constructor-arg index="2" value="Victoria"></constructor-arg>
 </bean>
 
</beans>
Next create a main class under src as shown. File: com.ram.app.ConstructorInjectionApp.java
package com.ram.app;

import org.springframework.context.ApplicationContext;
import org.springframework.context.support.ClassPathXmlApplicationContext;


public class ConstructorInjectionApp {
 public static void main(String[] args) {
  ApplicationContext container = new ClassPathXmlApplicationContext("applicationContext.xml");
  Address addr = container.getBean("addr", Address.class);
  addr.display();
 }
}

Question: In the Address.java class we have defined two contructors. How will spring know which constructor has to be executed?
Answer: It is based on the number of "constructor-arg" tag. If we supply three tags, spring container will call three parameter constructor. It is not mandatory that we have to supply "type" and "index" in applicationContext.xml file.
If we do not specify, the first tag is considered as index 0.
Instead of index as the attribute, spring supports "name" attribute. The advantage of using name attribute is, we can know to which parameter the value has been supplied. For example:
  <bean id="addr" class="com.ram.app.Address">
  <constructor-arg name="street" value="Richmond"></constructor-arg>
  <constructor-arg name="city" value="Melbourne"></constructor-arg>
  <constructor-arg name="state" value="Victoria"></constructor-arg>
 </bean>
 
</beans>
Execute ConstructorInjectionApp.java file. Output is given below.

Autowire Example

What is wiring? Connecting two different objects is called as wiring or establishing the dependency between two objects is called wiring. In other words bean wiring is the process of combining beans with Spring container. Spring has come with a feature known as autowire. Using autowire beans can be wired automatically. Autowire attribute takes different values. They are:
  • no/default: If autowire="no" the spring container check whether all the properties are mapped or not. If not mapped it will check autowire value. As it is "no", it will not take care of autowiring.
  • byName: If autowire="byName" spring container checks whether all the properties are mapped or not. If mapped autowiring will be performed. If not mapped it takes the property name and checks if there is any spring bean id available with that property name. If it is available it will establish the dependencies.
  • byType: If autowire="byType" spring container checks whether all the properties are mapped or not. If not matching it checks the autowire attribute. As it is "byType" spring container will check is there any spring whose data type matches with the property data type. If it matches it will establish the dependencies.
  • constructor: This is analogous to byType, but applies to constructor arguments.
First create an Address bean under src as shown below. File: com.ram.beans.Address.java
package com.ram.beans;

public class Address {
 private String street;
 private String city;
 private String state;
 
 public String getStreet() {
  return street;
 }
 public void setStreet(String street) {
  this.street = street;
 }
 public String getCity() {
  return city;
 }
 public void setCity(String city) {
  this.city = city;
 }
 public String getState() {
  return state;
 }
 public void setState(String state) {
  this.state = state;
 }
}

Next create a Person bean under src as shown below. File: com.ram.beans.Person.java
package com.ram.beans;

public class Person {
 private String pid;
 private String name;
 private Address address;
 
 public String getPid() {
  return pid;
 }
 public void setPid(String pid) {
  this.pid = pid;
 }
 public String getName() {
  return name;
 }
 public void setName(String name) {
  this.name = name;
 }
 public Address getAddress() {
  return address;
 }
 public void setAddress(Address address) {
  this.address = address;
 }
}

Next create applicationContext.xml file under src. The file is given below.
<?xml version="1.0" encoding="UTF-8"?>
<beans xmlns="http://www.springframework.org/schema/beans"
 xmlns:xsi="http://www.w3.org/2001/XMLSchema-instance" 
 xmlns:p="http://www.springframework.org/schema/p"
 xsi:schemaLocation="http://www.springframework.org/schema/beans 
 http://www.springframework.org/schema/beans/spring-beans-3.0.xsd">
 
 <bean id="addr" class="com.ram.beans.Address">
  <property name="street" value="Richmond"></property>
  <property name="city" value="Melbourne"></property>
  <property name="state" value="Victoria"></property>
 </bean>
 
 <bean id="person" class="com.ram.beans.Person" autowire="byName">
  <property name="pid" value="1"></property>
  <property name="name" value="Ram"></property>
 </bean>
 
</beans>
Next create a main class under src as shown. File: com.ram.app.AutoWireExample.java
package com.ram.app;

import org.springframework.context.ApplicationContext;
import org.springframework.context.support.ClassPathXmlApplicationContext;

import com.ram.beans.Person;

public class AutoWireExample {
 public static void main(String[] args) {
  ApplicationContext container = new ClassPathXmlApplicationContext("applicationContext.xml");
  Person person = container.getBean("person", Person.class);
  
  System.out.println("Person Id = "+person.getPid());  
  System.out.println("Person Name = "+person.getName());
  System.out.println("Street = "+person.getAddress().getStreet());
  System.out.println("City = "+person.getAddress().getCity());
  System.out.println("State = "+person.getAddress().getState());
 }
}

Execute AutoWireExample.java file. Output is given below.
<bean id="person" class="com.ram.beans.Person" autowire="byType">