Spring MVC hello world example

To understand Spring MVC, let's take the example of a simple hello world program.
Let us start our Hello World program with a controller. Any user request is first taken by the DispatcherServlet. The DispatcherServlet reads the URL, and executes the appropriate method in the controller. The class has been annotated with the @Controller annotation. This indicates that this class is a spring mvc controller and it is capable of handling web requests. This class will be recognized as a controller for processing requests, by the spring container when it scans the packages.
The helloWorld() method has been annotated with a @RequestMapping annotation. This annotation tells spring that this controller should process all the requests beginning with "/hello" in the URL. The URL may include "/hello.html" or "/hello.jsp" etc. Instead of using "/hello" in the helloWorld() we can use "/" as well. The helloWorld() method returns ModelAndView object. This object contains a message with key "message" and its related value "Hello World!". This data is passed to the view.
File: com.ram.controller.HelloWorldController.java
package com.ram.controller;

import org.springframework.stereotype.Controller;
import org.springframework.web.bind.annotation.RequestMapping;
import org.springframework.web.servlet.ModelAndView;

@Controller
public class HelloWorldController {
 @RequestMapping("/hello")
 public ModelAndView helloWorld(){
  
  String message = "Hello World!";
  return new ModelAndView("hello","message", message);
 }
}

File: WEB-INF/jsp/hello.jsp
<html>
<head>
    <title>Spring 3.0 Hello World</title>
</head>
<body>
    ${message}
</body>
</html>

This hello.jsp will display the value in the message that is passed by the controller.
File: WebContent/index.jsp
<html>
<head>
    <title>Spring 3.0 Hello World</title>
</head>
<body>
    <a href="hello.html">Click here</a>
</body>
</html>

File: WEB-INF/web.xml
<?xml version="1.0" encoding="UTF-8"?>
<vweb-app xmlns:xsi="http://www.w3.org/2001/XMLSchema-instance"
    xmlns="http://java.sun.com/xml/ns/javaee"
    xmlns:web="http://java.sun.com/xml/ns/javaee/web-app_2_5.xsd"
    xsi:schemaLocation="http://java.sun.com/xml/ns/javaee http://java.sun.com/xml/ns/javaee/web-app_2_5.xsd"
    id="WebApp_ID" version="2.5">
    
    <display-name>Spring 3 MVC Hello World</display-name>
    <welcome-file-list>
        <welcome-file>index.jsp</welcome-file>
    </welcome-file-list>
 
    <servlet>
        <servlet-name>dispatcher</servlet-name>
        <servlet-class>org.springframework.web.servlet.DispatcherServlet</servlet-class>
    </servlet>
    
    <servlet-mapping>
        <servlet-name>dispatcher</servlet-name>
        <url-pattern>*.html</url-pattern>
    </servlet-mapping>
    
</web-app>

In the "web.xml" we define DispatcherServlet which acts as front controller or the entry point for the request.
File: WEB-INF/dispatcher-servlet.xml
<?xml version="1.0" encoding="UTF-8"?>
<beans xmlns="http://www.springframework.org/schema/beans"
    xmlns:xsi="http://www.w3.org/2001/XMLSchema-instance"
    xmlns:p="http://www.springframework.org/schema/p"
    xmlns:context="http://www.springframework.org/schema/context"
    xsi:schemaLocation="http://www.springframework.org/schema/beans
 http://www.springframework.org/schema/beans/spring-beans-3.0.xsd
 http://www.springframework.org/schema/context
 http://www.springframework.org/schema/context/spring-context-3.0.xsd">
 
    <context:component-scan base-package="com.ram.controller" />
    
    <bean id="viewResolver" class="org.springframework.web.servlet.view.InternalResourceViewResolver">
        <property name="prefix" value="/WEB-INF/jsp/" />
        <property name="suffix" value=".jsp" />
    </bean>
    
</beans>

In the "dispatcher-servlet.xml" file context:component-scan which will allow spring to load all the components from the package given. Next comes the bean id "view resolver". ViewResolver decides which View is responsible for rendering the response and also adds prefix and suffix.
Run the project "SpringMVCHelloWorld" and you get output in the browser as shown below. Click on "Click here" and "Hello World!" message is displayed.

Spring MVC Introduction

This blog explains about the Spring MVC architecture. Below two diagrams give an overview of Spring architecture.
  • In coming requests are handled by Front Controller. Spring MVC uses a java servlet known as DisptcherServlet. This servlet is responsible for receiving requests, delegate real work to POJO's called controllers. In order to delegate the task to appropriate controller, DispatherServlet takes the help of Handler mapping.
  • Handler mapping takes the request and based on the request URL the request is dispatched to the appropriate controller.
  • Once the controller receives the request, it processes the data and performs any business logic related to the application.
  • Once the controller is done with the business logic, it generates output. This output is sent to the view, but this output should be formatted in a way that user can understand.
  • The controller for formatting the view, takes the help of ModelAndView. ModelAndView is a component which takes both Model and View from the controller and encapsulates it in a ModelAndView object and gives it to the DispatcherServet.
  • The DipatcherServlet takes the ModelAndView object and passes it to ViewResolver. Depending on the object, ViewResolver will return the appropriate view.

Spring Hibernate integration

In this post we will see an example of how to integrate hibernate with spring. The steps are self explanatory as they are very similar to the steps for using JdbcTemplate.
Points to ponder:
  • @Entity : This annotation states that the POJO class as an entity.
  • @Id : This annotation declares the identifier property of this entity.
  • <context:annotation-config/> : It is used to activate annotations in beans already registered in the application context.
  • <context:component-scan/> : It scans packages to find and register beans within the application context.
  • @Repository : This annotation is a stereotype for persistence layer. It indicates that the class defines a data repository.
  • @Autowired : @Autowired indicates that spring should inject dependency, based on its type or based on its name if used with the @Qualifier annotation.
File: com.ram.model.Departments.java
package com.ram.model;

import javax.persistence.Entity;
import javax.persistence.Id;

@Entity
public class Departments {
 @Id
 private int department_id;
 private String department_name;
 private int manager_id;
 private int location_id;
 
 public int getDepartment_id() {
  return department_id;
 }
 public void setDepartment_id(int department_id) {
  this.department_id = department_id;
 }
 public String getDepartment_name() {
  return department_name;
 }
 public void setDepartment_name(String department_name) {
  this.department_name = department_name;
 }
 public int getManager_id() {
  return manager_id;
 }
 public void setManager_id(int manager_id) {
  this.manager_id = manager_id;
 }
 public int getLocation_id() {
  return location_id;
 }
 public void setLocation_id(int location_id) {
  this.location_id = location_id;
 }
 
}

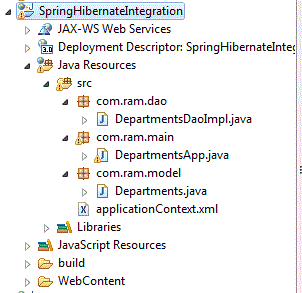
Next create applicationContext.xml file under src. The file is given below.
<?xml version="1.0" encoding="UTF-8"?>
<beans xmlns="http://www.springframework.org/schema/beans"
       xmlns:xsi="http://www.w3.org/2001/XMLSchema-instance"
       xmlns:aop="http://www.springframework.org/schema/aop"
       xmlns:context="http://www.springframework.org/schema/context"
       xsi:schemaLocation="http://www.springframework.org/schema/beans 
       http://www.springframework.org/schema/beans/spring-beans-3.0.xsd 
       http://www.springframework.org/schema/context 
       http://www.springframework.org/schema/context/spring-context-3.0.xsd
       http://www.springframework.org/schema/aop 
       http://www.springframework.org/schema/aop/spring-aop-3.0.xsd">
 
    <context:annotation-config/>
 
    <context:component-scan base-package="com.ram.dao"></context:component-scan>
 
    <bean id="dataSource" class="org.apache.commons.dbcp.BasicDataSource">
        <property name="driverClassName" value="oracle.jdbc.driver.OracleDriver"/>
        <property name="url" value="jdbc:oracle:thin:@localhost:1521:xe"/>
        <property name="username" value="hr"/>
        <property name="password" value="hr"/>
        <property name="initialSize" value="2"/>
        <property name="maxActive" value="5"/>
    </bean>
       
    <bean id="sessionFactory" class="org.springframework.orm.hibernate3.annotation.AnnotationSessionFactoryBean">
  <property name="dataSource" ref="dataSource"/>
  <property name="packagesToScan" value="com.ram.model"></property>
      
  <property name="hibernateProperties">
      <props>
     <prop key="hibernate.dialect">org.hibernate.dialect.OracleDialect</prop>
     <prop key="hibernate.show_sql">true</prop>
            <prop key="hibernate.hbm2ddl.auto">update</prop>
      </props>
  </property>
    </bean>
 
</beans>
File: com.ram.dao.DepartmentsDaoImpl.java
package com.ram.dao;

import org.hibernate.Query;
import org.hibernate.SessionFactory;
import org.springframework.beans.factory.annotation.Autowired;
import org.springframework.stereotype.Repository;

@Repository
public class DepartmentsDaoImpl {
 @Autowired
 private SessionFactory sessionFactory;
 
 public int getDepartmentsCount(){
  String hql = "select count(*) from Departments";
  Query query = getSessionFactory().openSession().createQuery(hql);
  return ((Long)query.uniqueResult()).intValue();
 }
 
 public SessionFactory getSessionFactory() {
  return sessionFactory;
 }

 public void setSessionFactory(SessionFactory sessionFactory) {
  this.sessionFactory = sessionFactory;
 }
 
}


File: com.ram.main.DepartmentsApp.java
package com.ram.main;

import org.springframework.context.ApplicationContext;
import org.springframework.context.support.ClassPathXmlApplicationContext;

import com.ram.dao.DepartmentsDaoImpl;

public class DepartmentsApp {
 public static void main(String[] args) {
  ApplicationContext context = new ClassPathXmlApplicationContext("applicationContext.xml");
  DepartmentsDaoImpl departmentsDaoImpl = context.getBean("departmentsDaoImpl",DepartmentsDaoImpl.class);
  System.out.println("Total rows in departments table = "+departmentsDaoImpl.getDepartmentsCount());
 }
}


Execute DepartmentsApp.java file. Output is given below.

Handling errors in JSP

Interview Question: How do you handle errors in JSP?
Answer: ErrorPage = "ErrorPage.jsp" is used to indicate that the web container has to execute "ErrorPage.jsp" if there is any problem in executing the actual jsp page. We also need to set isErrorPage="true" for all the pages which may throw an error. By default isErrorPage="false" for all the jsp pages.
When a problem is encountered while executing the actual jsp page, the output that is generated till that point will be discarded by the container and the output generated by the error page will be sent to the browser. Below code is a simple example which shows how to use error page. For this example I have thrown a random exception.
File: ErrorPage.jsp

<html>
<head>
<title></title>
</head>

<body>
<p style="color: red;">Error Page: Error occurred because of ...</p>
</body>
</html>
</pre>
</div>

File: ErrorPageExample.jsp

<%@ page isErrorPage="true" %>
<%@ page errorPage="ErrorPage.jsp" %>

<%
throw new ArrayIndexOutOfBoundsException();
%>

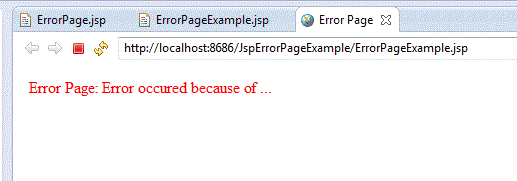
Run ErrorPageExample.jsp and you get the output as shown below:

Buffer

<%
for(int i=0;i<100;i++){
 System.out.println("Hello World <br>");
}

<jsp:forward page="Two.jsp"/>
In the above example, if we execute the above piece of code, we get the output from Two.jsp. But if we use "i<1000", the container fails. This is the problem with jsp:forward. To improve the performance of network server and client, buffering technique will be used by the jsp writer to reduce the network traffic.
<%@ page buffer="1kb" %>

<%
for(int i=0;i<100;i++){
 System.out.println("Hello World <br>");
}

<jsp:forward page="Two.jsp"/>
When we send a request to the above jsp file, initially 1024(1kb) bytes of memory will be allocated and the content that is generated by the jsp will be collected in the buffer (In this example the total amount of content generated by the jsp is less than the size of the buffer) and then it will be sent to the client at once.
If we change i value to less than 200 and then send a request to the above jsp page 1kb of memory will be allocated as buffer. The jsp page generates more than 1kb of data. In this case initially 1024 bytes will be collected in the buffer. After this the buffer will be flushed (The content will be sent to the client). After this the remaining amount of data that is 2000-1024 will be collected in the buffer and it will be sent to the client.
Interview Question: What is buffer over flow and how do you solve the problem?
Answer:
<%@ page buffer="10kb" %>
<%@ page autoFlush="false" %>

<%
for(int i=0;i<20000;i++){
 System.out.println("Hello World <br>");
}

<jsp:forward page="Two.jsp"/>
When a request is sent to the above jsp page "10kb" of memory will be allocated. Then 10kb of output will be collected as we have used autoFlush="false" the buffer will not be flushed and the content generated by the jsp cannot be accomplished in the buffer. This condition is called "buffer overflow".
We can solve this problem by increasing the buffer size so that the whole content generated by the jsp can be accomodated in the buffer or we can use the autoFlush="true". autoFlush is by default is true.

JSP action tags

JSP has come up with a set of standard action tags. The action tags are provided to eliminate java code from the jsp files. The action tags are as follows:
  • include
  • forward
  • useBean
  • setProperty
  • getProperty
The below code is an example of jsp include action tag
<jsp: include page="two.jsp" />
A simple example of include action tag is given below.
File: Two.jsp
<%@ page language="java" contentType="text/html; charset=ISO-8859-1"
    pageEncoding="ISO-8859-1"%>
<!DOCTYPE html PUBLIC "-//W3C//DTD HTML 4.01 Transitional//EN" "http://www.w3.org/TR/html4/loose.dtd">
<html>
<head>
<meta http-equiv="Content-Type" content="text/html; charset=ISO-8859-1">
<title>Two page</title>
</head>
<body>
This is from Two.jsp
</body>
</html>

File: One.jsp
<%@ page language="java" contentType="text/html; charset=ISO-8859-1"
    pageEncoding="ISO-8859-1"%>
    
<jsp:include page="Two.jsp"/>

<!DOCTYPE html PUBLIC "-//W3C//DTD HTML 4.01 Transitional//EN" "http://www.w3.org/TR/html4/loose.dtd">
<html>
<head>
<meta http-equiv="Content-Type" content="text/html; charset=ISO-8859-1">
<title>One page</title>
</head>
<body>
This is from One.jsp
</body>
</html>

Run One.jsp and you get the output as shown below:
Interview Question: What is the difference between include directive and include action action tag?
Answer:
  • When we use jsp:include action tag, two servlets will be generated.
  • Since two servlets are created, include tag may take slightly more amount of time than include directive.
  • If we use include action tag, whenever main jsp file is changed or modified a new servlet will be generated. For include page directive the web container regenerates the servlet when there is a change in the main file.
jsp forward: The forward tag forwards the request to another source. In other words forward action terminates the action of the current page and forwards the request to another resource. Another source can be anything like HTML file, servlet or another JSP file. In the above example in One.jsp instead of "jsp:include" tag replace with the below "forward" tag.
<jsp:forward page="Two.jsp"/>

Then the output will be:
"This is from Two.jsp"

JSP Directives with example

"resin" is the server which supports java script and java language but most of the servers support only java language.
<%@ page language="perl" %> The above statement is called page directive. This page directive gives an instruction to the jsp compiler that we are using the perl language. A page directive is an instruction to the jsp compiler. Some more page directives are:
<%@ page import="java.sql.*" %>
<%@ page import="java.util.Date" %>
This is an example of multiple import directives.
The above multiple page directives can be clubbed together as a single page directive as shown below:
<%@ page import="java.util.Date, java.sql.*" %>
To use the classes or interfaces available in different packages, we can use the import directive as shown below:
<%@ include file="two.jsp" %>
This include directive is similar to requestDispatcher.include in servlets.
A simple example of include directive is given below.
File: Two.jsp
<%@ page language="java" contentType="text/html; charset=ISO-8859-1"
    pageEncoding="ISO-8859-1"%>
<!DOCTYPE html PUBLIC "-//W3C//DTD HTML 4.01 Transitional//EN" "http://www.w3.org/TR/html4/loose.dtd">
<html>
<head>
<meta http-equiv="Content-Type" content="text/html; charset=ISO-8859-1">
<title>Two page</title>
</head>
<body>
This is from two.jsp
</body>
</html>

File: One.jsp
<%@ page language="java" contentType="text/html; charset=ISO-8859-1"
    pageEncoding="ISO-8859-1"%>
    
<%@ include file="Two.jsp" %>

<!DOCTYPE html PUBLIC "-//W3C//DTD HTML 4.01 Transitional//EN" "http://www.w3.org/TR/html4/loose.dtd">
<html>
<head>
<meta http-equiv="Content-Type" content="text/html; charset=ISO-8859-1">
<title>One page</title>
</head>
<body>
This is from one.jsp
</body>
</html>

Run One.jsp and you get the output as shown below:
When the jsp compiler compiles one.jsp the compiler merges the content of two.jsp with one.jsp as shown in the above output. After merging a single servlet is generated. The included file need not be a jsp file.

Implicit variables or well known variables

In the previous post we have seen how jsp is compiled into a servlet. But when the code is compiled by a java compiler it will generate an error indicating that we are using a variable "j" without declaring it.
According to the jsp specification we can use the following variables as part of the scriptlets without declaring the variables in the jsp page. These variables are called as "well known variables" or "implicit variables". There are 9 implicit variables:
  • pageContext
  • session
  • request
  • response
  • application
  • config
  • out
  • page
  • exception
pageContext is a convenient class which provides the methods like forward, include, getSession, getServletConfig, getServletContext, getRequest, getResponse, setAttribute, getAttribute, removeAttribute etc.
request object is an instance of a java class that implements the javax.servlet.http.HttpServletRequest interface. The request object can be used to get header information, parameters, attributes etc.
response object is an instance of a java class that implements the javax.servlet.http.HttpServletResponse interface. Using the "response" object we can set the response content type, add cookie and redirect the response.
session object is an instance of a java class that implements the javax.servlet.http.HttpSession interface. Using the "session" object we can store session state for a single user.
application object is an instance of a java class that implements the javax.servlet.ServletContext interface. It gives facility for a JSP page to obtain and set information about the web application in which it is running.
out object is an instance of the javax.servlet.jsp.JspWriter class. Using the "out" object we can send some content to the client. In other words we can write the output content.

Some JSP tags

As part of jsp page we can use various elements.Template text that is placed as part of the jsp will be passed onto the client as it is. The code written between <% and %> is called scriptlet. In the below jsp page line one and last line tags are called as template text.
last line <br>
<%
for(int i=0; i<10; i++){
 System.out.println("Hi");
}
%>
<br> last line
<% start of the scriptlet
%> end of scriptlet
Whatever is added between <% and %> is called scriptlet and it is placed as it is in the service method. According to the jsp specification web container can support any language for implementing scriptlet. But most of the vendors are supporting only java language for implementing the scriptlets.
line one <br>
<%
System.out.println("Hi "+j);
%>
<br> last line
The above jsp file will be converted into a servlet by the jsp compiler as shown below:
public class first_ser extends ...{
 ...
 try{
 ...
 out.println("line one <br>");
 System.out.println("Hi "+j);
 out.println("<br> last line");
 ...
}
<%! int x = 100;
<%! indicates that it is a declarative statement. x will be declared as a instance variable of the servlet.

JSP tutorial

JSP Introduction

JSP stands for Java Server Page. JSP provides a easy and fast way to create dynamic web content. JSP is a server side programming technology for developing web pages. Using JSP developers can insert java code in HTML pages by making use of JSP tags. When a jsp file is compiled, it creates a java file in other words it creates servlet. The flow of JSP compilation is shown in the below diagram.
Every web container vendor provides a tool called jsp compiler (jspc). This tool takes jsp file as a parameter and generates a java file that contains the code for a servlet. This java file will be compiled by using javac.
When we send a request to a java server page, the web container checks whether there exists a servlet corresponding to the java server page If there is no servlet internally the web container runs the jsp compiler (jspc) to generate a servlet class. This class will be used to create a servlet object. If the servlet is already available the web container will not use the jsp compiler.